Some of Analyzify’s data layer events (such as add-to-cart, remove-from-cart, and begin-checkout) are triggered when a user clicks on a specific button on a website. Since these buttons can differ in terms of style and HTML code from store to store, there may be times when such events may not be working as expected on your own website. With the new version of Analyzify, you can now easily fix when one of the click-based events is not working.
Suppose that the add-to-cart event is not being fired when you click on the “Add-to-cart” button on a product detail page. Let’s go through what should be done and fix it together:
1. Locate the button on your website
First of all, you should go to your website and find the button that doesn’t trigger the necessary event. In our scenario, the “add-to-cart” button on a product detail page is not working. Open a product detail page, find the add-to-cart button, and right-click on it. Then, choose “Inspect”. This will open the developer panel of the browser and show you the HTML attributes of this button.

2. Choose a proper attribute name and value
The red arrows in the following screenshot show attribute names while the blue ones show attribute values.
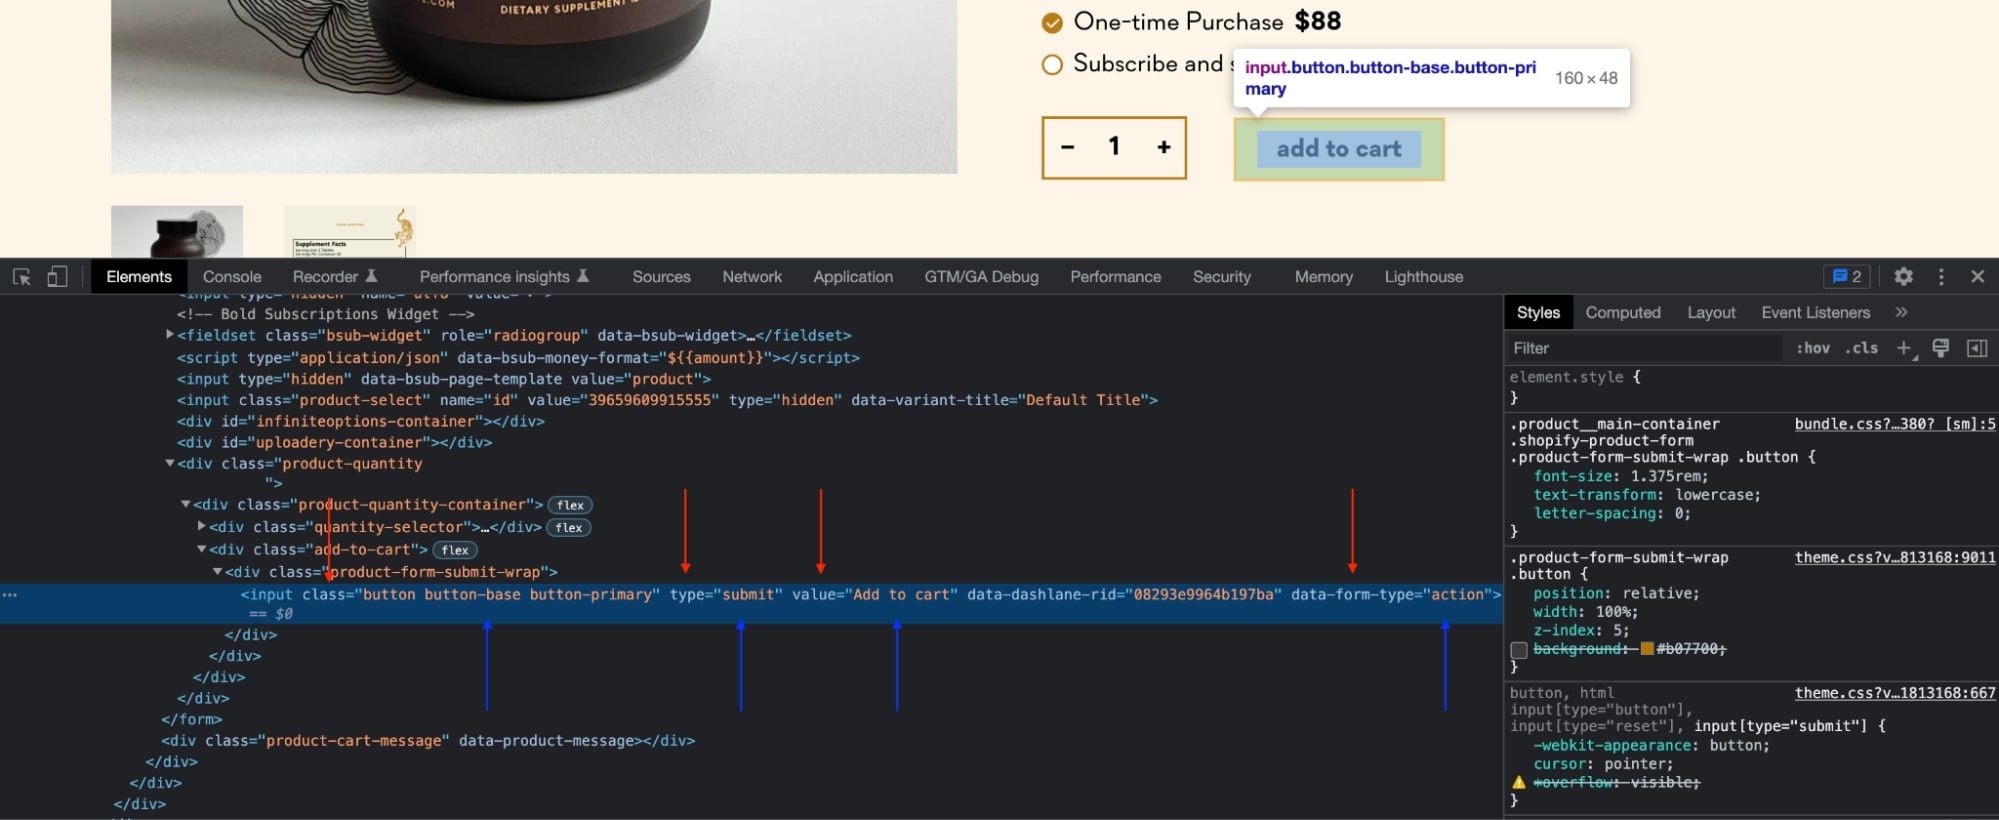
Important: Please select an HTML attribute value that doesn’t have a common name like “button”, “btn”, “form”, etc. Otherwise, add-to-cart events will be sent when you click other buttons that have the same attribute.
In this case, choosing the attribute name as “class” and the attribute value as “button” is not a good idea. Instead, you can choose the attribute name as “value” and the attribute value as “Add-to-cart”. If you cannot find a proper attribute, you can ask your developer to add it for you.
3. Locate Analyzify’s liquid file and choose the related configuration line
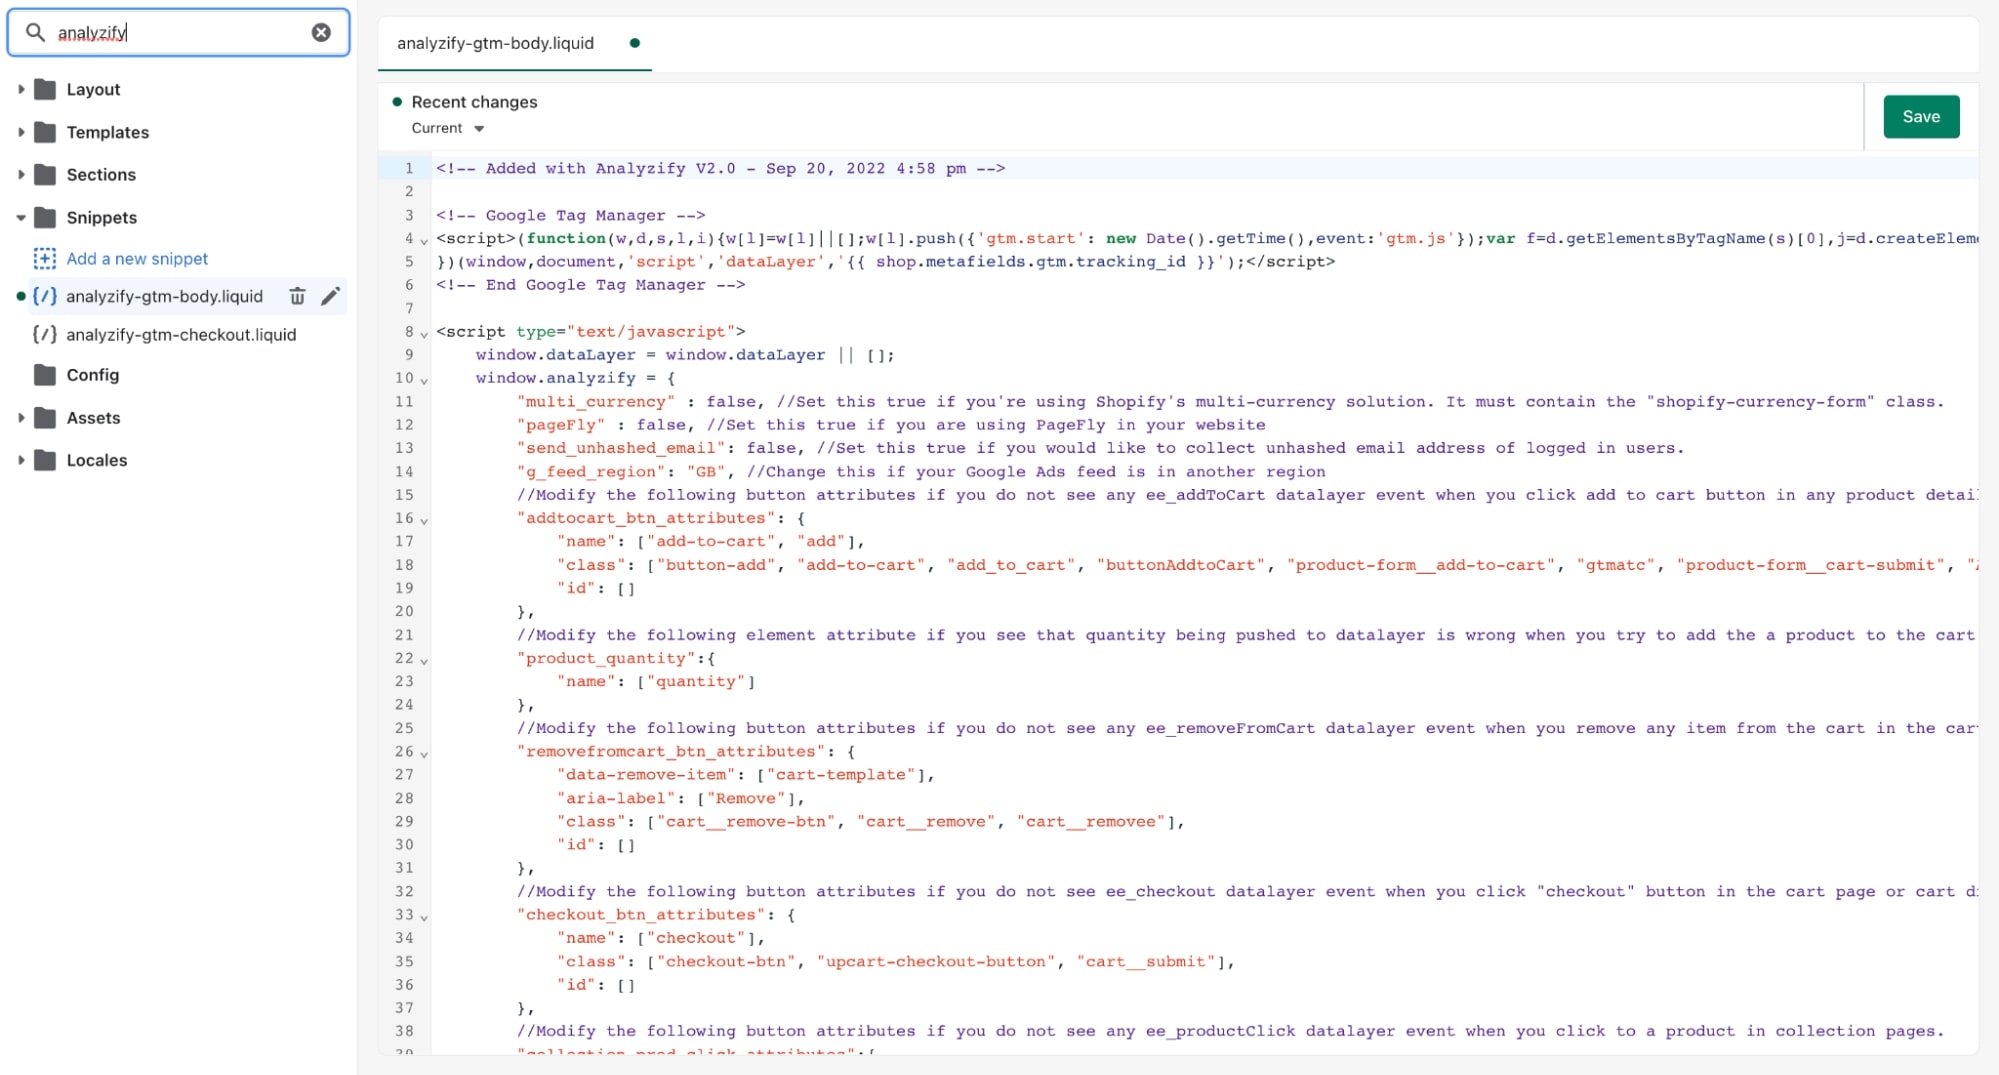
Start by heading to your Shopify Admin panel > “Sales Channel” > “Online Store” > “Themes”, then select the theme you installed Analyzify and click “Edit code”. Open the analyzify-gtm-body.liquid file under the “Snippets” folder. If you don’t see this file, it means that Analyzify hasn’t been installed on that theme. If that’s the case, please either find the theme you installed Analyzify on or install Analyzify to your theme of choice.
Once you do, you should see a file like this:
If the file and the codes seem rather different, then you may be using an older version of Analyzify. If so, please upgrade your version of Analyzify through this article first before proceeding with the next steps.
If everything seems ok, you can move on to locating the configuration lines on the liquid file, which should be at the top of the screen. Please refer to the following table to find the necessary configurations according to your need.
|
Configuration Name |
Description |
|
addtocart_btn_attributes |
Modify this configuration if you do not see any ee_addToCart data layer event when you click on the add-to-cart button on any product detail page. |
|
collection_atc_attributes |
Modify this configuration if you do not see any ee_addToCart data layer event when you click on the add-to-cart button in any collection pages. |
|
product_quantity |
Modify this configuration if you see that the quantity being pushed to the data layer is wrong when you try to add a product to the cart with more than 1 as the quantity. |
|
removefromcart_btn_attributes |
Modify this configuration if you do not see any ee_removeFromCart data layer event when you remove an item from the cart on the cart page. |
|
checkout_btn_attributes |
Modify this configuration if you do not see the ee_checkout data layer event when you click the checkout button on the cart page or cart drawer. |
|
collection_prod_click_attributes |
Modify this configuration if you do not see any ee_productClick data layer event when you click on a product on collection pages. |
|
search_prod_click_attributes |
Modify this configuration if you do not see any ee_productClick data layer event when you click on a product in search result pages. |
4. Update the related configuration
Continuing from our scenario (add-to-cart not working), we will now update the “addtocart_btn_attributes” configuration. The configuration looks like this:
//Modify the following button attributes if you do not see any ee_addToCart datalayer event when you click add to cart button in any product detail page.
"addtocart_btn_attributes": {
    "name": ["add-to-cart", "add"],
    "data-add-to-cart-text": ["Add to Cart"],
    "class": ["button-add", "add-to-cart", "add_to_cart", "buttonAddtoCart", "product-form__add-to-cart", "gtmatc", "product-form__cart-submit", "AddToCartText", "AddToCart", "AddToCart-product-template"],
    "id": []
}
When you open the same configuration you may see different values as we update those configurations every day to capture clicks more accurately on most of the stores.
We have chosen the add-to-cart button attribute name as “value” and attribute value as “Add to cart” in Step 2. Now, let’s update the code accordingly.
The main logic is simple, find the necessary attribute name and add the attribute value to the list [other values, “your new attribute value”]. If you cannot find any attribute name, you can create it by adding a comma at the end of the line and typing your own attribute name.
In this example, there is no “value” attribute in the configuration. Therefore, you should add it like this:
//Modify the following button attributes if you do not see any ee_addToCart datalayer event when you click add to cart button in any product detail page.
"addtocart_btn_attributes": {
    "name": ["add-to-cart", "add"],
    "data-add-to-cart-text": ["Add to Cart"],
    "class": ["button-add", "add-to-cart", "add_to_cart",               "buttonAddtoCart", "product-form__add-to-cart", "gtmatc", "product-form__cart-submit", "AddToCartText", "AddToCart", "AddToCart-product-template"],
    "id": [],
    "value": ["Add to cart"]
}
If you would like to add any attribute value to an existing attribute name, you can do it like this:
//Modify the following button attributes if you do not see any ee_addToCart datalayer event when you click add to cart button in any product detail page.
"addtocart_btn_attributes": {
    "name": ["add-to-cart", "add"],
    "data-add-to-cart-text": ["Add to Cart"],
    "class": ["button-add", "add-to-cart", "add_to_cart",               "buttonAddtoCart", "product-form__add-to-cart", "gtmatc", "product-form__cart-submit", "AddToCartText", "AddToCart", "AddToCart-product-template","your new class value"],
    "id": ["your new id value"]
}
“your new id value” and “your new class value” are the new code lines we have added to make this configuration work. Please do not forget to add your new value within quotation marks (“”), and please do not forget to add commas (,) to the previous line or value.
That’s all! When you save the theme and test it, you should see that the data layer events are working now. If you think that there is still a problem, please do not hesitate to contact our support team.
